Sometimes all it takes is a broken water heater, a solar panel system, and a bit of spare time to open the door to a whole new learning opportunity. For me, that door led straight into the world of smart home automation — where DIY meets curiosity and everyday decisions become small engineering challenges.
Some months ago I realised that my heating (and hot water preparation) system needs some changes – my hot water cylinder became defective after 13 years (could that 13 be the issue? No, in reality, it was an expansion vessel at the root of the problem, but that’s beyond the scope of this article).
So I had to decide for a new setup and I was contemplating the idea of installing a heat pump…I did some research, it ticked a lot of boxes but in the context of the new energy market regulations in Romania, even with solar panels, the investment into a heat pump was not efficient without having installed some consistent battery storage capacity (which in my case was planned but not sure for this year) and even then, the ROI wasn’t so amazing in my case compared to changing the condensation heating boiler (and water cylinder) with a new (more modern) one.
But, since I had the solar panels, I thought that at least I could purchase a water cylinder that has dual heating (boiler/gas heating and electric serpentine heating) with a first priority for electricity based heating.
So the simplest way to do it is to define the thermostat points for those 2 heating systems at a level that would allow the electric heating to start first and gas powered heating to start only if (or in addition to) electric heating was not done.
I had some conversation with the installer of the heating system and the “smart” automation he proposed was a programable (WiFi accessible eventually) power socket, which would allow you to decide when you want to heat the water in the cylinder with the electric power (you could do it either manually or define a daily schedule).
But I wasn’t so happy with this solution as the “smart” aspect of the automation was still human and manual – you had to decide based on some other information you consume from your solar panels dashboard if you have the extra energy production you want to use to heat up the water or you’d rather wait for the bas powered boiler to heat up the water (as the gas cost for doing the heating work is lower than electricity cost for the same work).
Some Energy Economics
Considering the reference prices for July 2025 in Romania, you could say:
- 1 kwh (gas) is 0.4 RON
- 1 kwh (electricity) costs between 1.03 and 1.6 RON (depending on your provider and contract)
If you have 200L of water and want to heat it up from 50 Celsius to 60 Celsius you be spending:
- 2.35 kWh electric
- 2.45 kWh gas (considering a randament of 95% for a condensing gas boiler)
That means that cost wise (and time wise), it’s more efficient to heat up the water with gas instead of electricity (a 2000W heater) – the ratio being 3:1.
Step 1: Calculate the energy required
To heat 200L of water from 50°C to 60°C:
- Mass of water: 200L = 200 kg
- Temperature difference: 60°C – 50°C = 10°C
- Specific heat capacity of water: 4.184 kJ/kg·°C
Energy needed = 200 kg × 4.184 kJ/kg·°C × 10°C = 8,368 kJ = 2.324 kWh
Step 2: Account for system efficiency
Gas boiler (condensing, 20kW):
- Efficiency: ~90% (typical for condensing boilers)
- Gas energy needed: 2.324 kWh ÷ 0.90 = 2.58 kWh
Electric heater (2000W):
- Efficiency: ~100% (electric resistance heating)
- Electricity needed: 2.324 kWh
Step 3: Calculate costs (including 19% VAT)
Gas heating cost: 2.58 kWh × 0.4 RON/kWh × 1.19 = 1.23 RON
Electric heating cost: 2.324 kWh × 1.3 RON/kWh × 1.19 = 3.60 RON
Summary:
- Gas heating: 1.23 RON (takes ~7 minutes with 20kW boiler)
- Electric heating: 3.60 RON (takes ~70 minutes with 2kW heater)
Gas heating is about 3 times cheaper than electric heating for this task
So basically, heating with gas is (still) cheaper than electricity, but if the electricity is produced by you .. then it might make sense to use the electric power from solar panels to heat up the water in the cylinder.
Some may argue that, if you could sell your energy above 0.5RON then the electric heating doesn’t make economic sense at any moment because you could be purchasing cheaper gas at any moment than what you’d be getting from selling the electricity. But there’s a crucial catch in Romania’s prosumer system: you get paid for grid injection after 24 months, not immediately.
So even if the grid price is theoretically 0.6 RON/kWh today, you won’t see that money for two years. During the summer, when you have an energy production excess (and many others do too), the actual selling price is often below 0.5RON anyway.
Here’s why that 24-month delay matters economically:
If the current inflation would be 5% annually (it looks like after the recent tax changes it will be much higher) the present value after two years would be 10% lower than today.
Basically, PV = FV / (1+i)n , where i=5% and n=number of years (in my case 2)
That means that 0.6 RON now will be 0.544RON after 2 years. But realistically the inflation will be closer to 8% and then the value of that 0.6RON would be 0.514RON in two years.
Coming back, if you want to avoid this value dilution (and all the estimations of the price of the kWh you inject into the grid – that’s communicated by OPCOM at the end of the month as an average of the PZU price.. for example in June it was 0.459RON – source here) it makes sense to use your own electricity instead of injecting it in the grid.
Ok, one other important aspect to favor solar panels energy over gas is the green aspect – you tend to feel better if you can burn less fossil fuel and use the solar power.
That’s why is great to have the flexibility of mixing gas and electricity and have some automation that allows you to play with the values there, when to use gas and when to use electricity for heating up the water.
From Energy Economics to Automation Logic
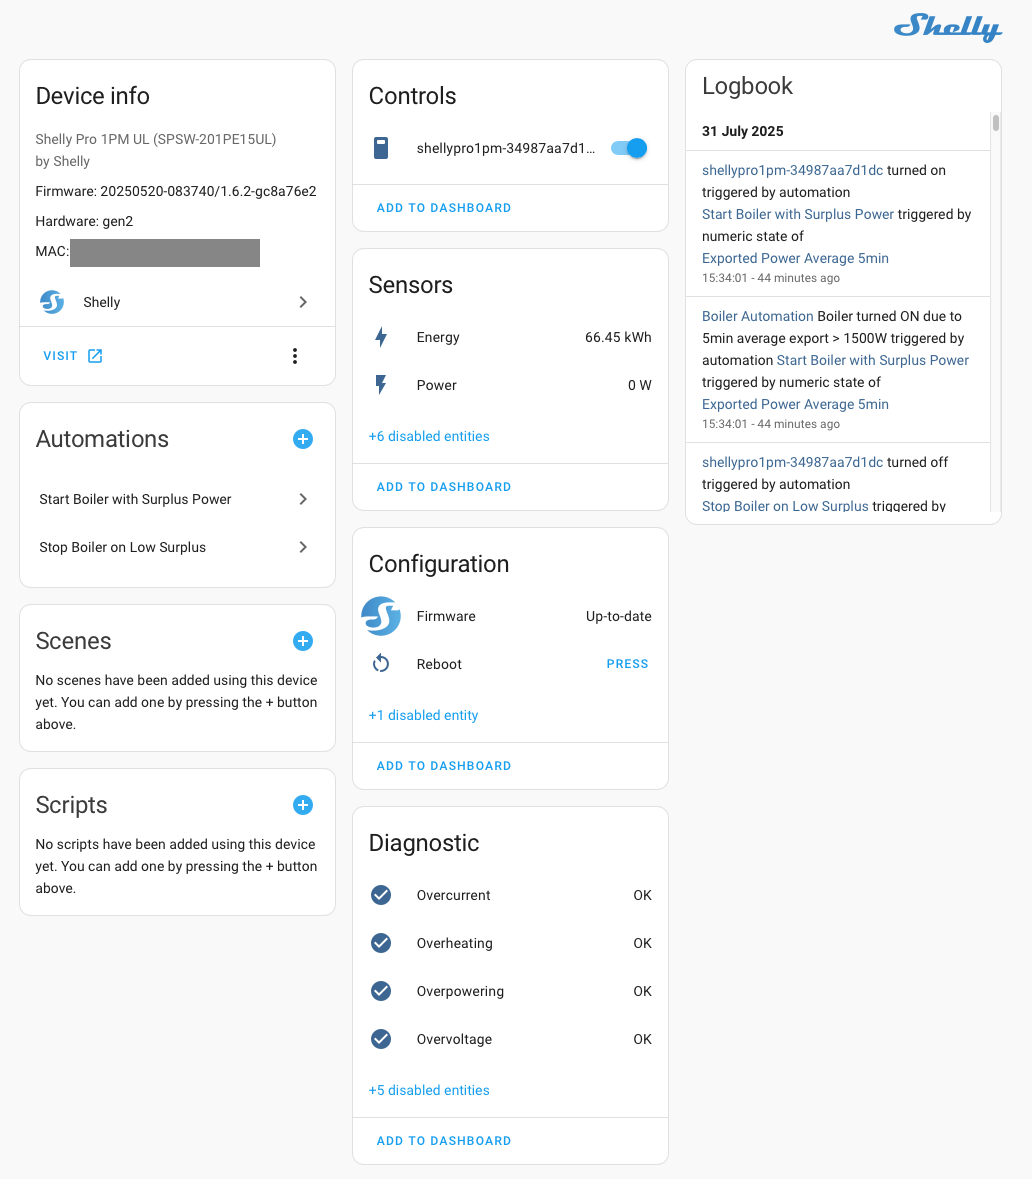
OK, so now .. let’s loot at the automation problem – instead of a programable socket you can go for a Shelly Switch (Shelly Pro 1PM with 16A output is good enough for my setup and has plenty of connectivity capability – https://www.shelly.com/products/shelly-pro-1pm) which allows you to create a smarter automation. Add to that Home Assistant (https://www.home-assistant.io) an open source solution for home automation which can offer out of the box connections to inverters, smart devices and is well maintained.
All you need to do is to make sure that the devices (Shelly, inverter and Home Assistant) are in the same network, for security reasons a isolated one – you install Home Assistant on a Raspberry Pi (which is no longer unavailable like in the pandemic period) and connect the others:
- Fronius (in my case) for the inverters and smart meter
- Shelly for the power switch
There is a wide array of devices and integrations available, too many to mention .. but if you have an IoT network, some of the devices won’t be visible there. If you use only one network, then you’ll have the flexibility but also some security concerns (risks).
Installing and configuring Home Assistant is pretty straightforward, you can download the distribution for your Raspberry Pi and if you installed other OS on RPi, it’s simple. The Home Assistant will scan your network and index your compatible devices, also you can add them one by one specifying the IP of the device (ideally you should have static IPs for those devices like inverter or Shelly)

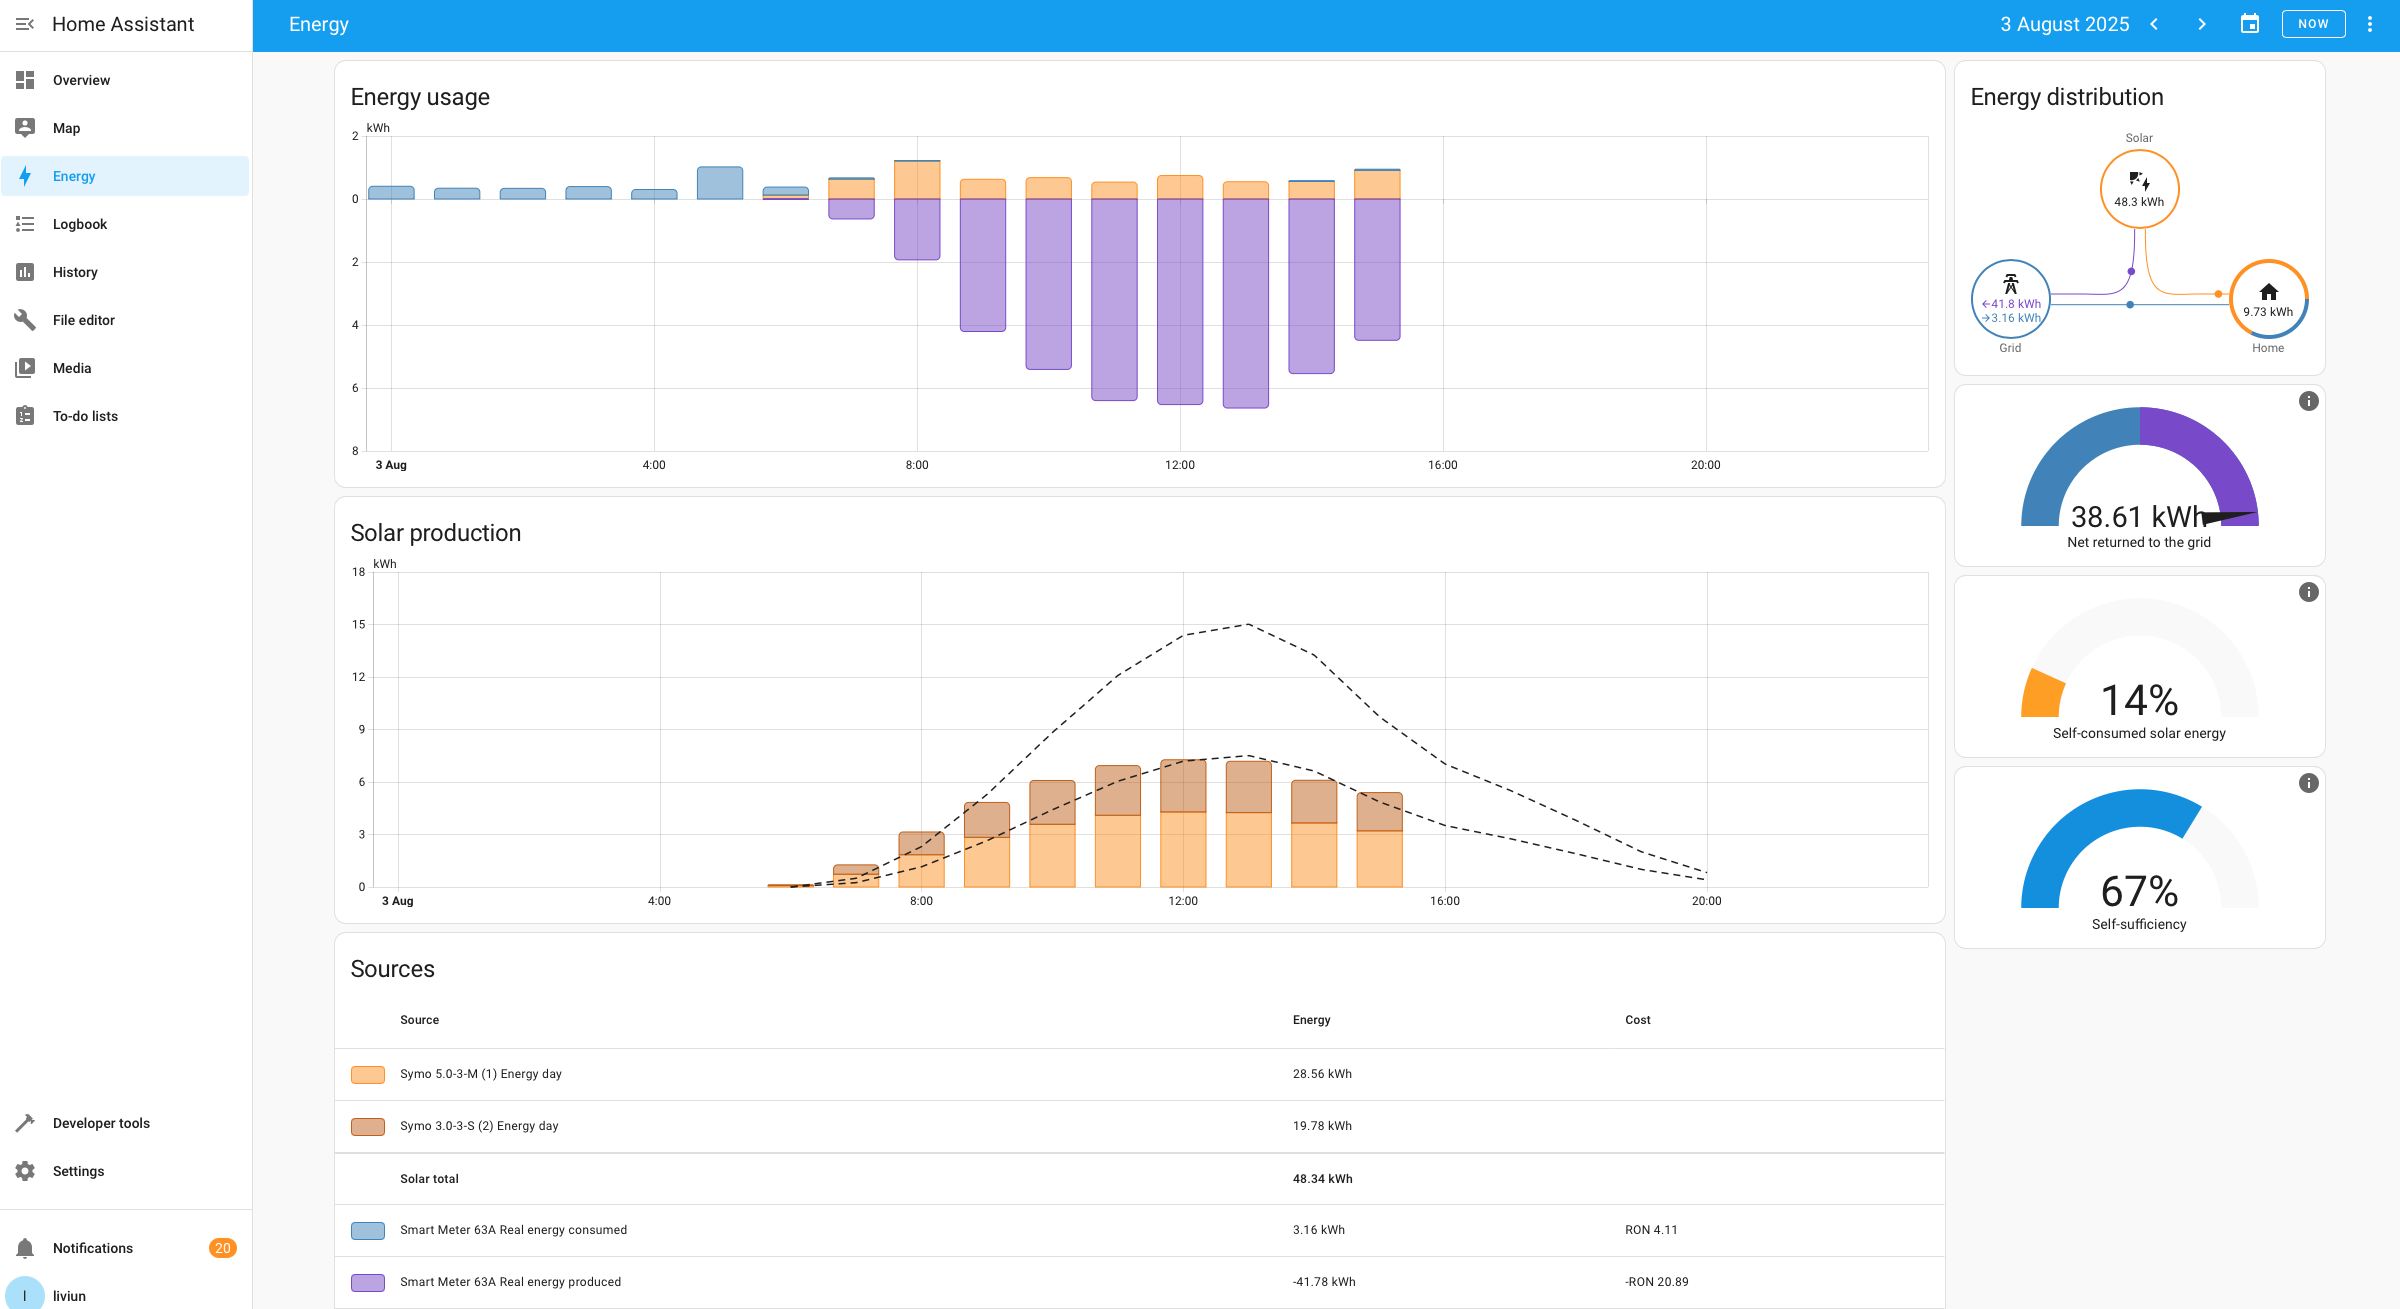
If you add your device and activate the integration, a lot of data is being made available and you can use those ones (or other derived from those) to make decisions.
Basically, the initial logic was just to have an excedent of power (which is naturally injected into the grid) that could be used for the electric heating- that’s up to 2000W, but I didn’t want to play that safe, so I moved that value to 1500W.
That power excedent shouldn’t be just for a moment in time, but rather a consistent behaviour, so I defined two sensors which are based on the exported power – the average for 5 minutes respectively for 10 minutes – which are not perfect proxies for the solar behaviour, but at least you don’t play with ON/OFF just by the move of some small cloud.
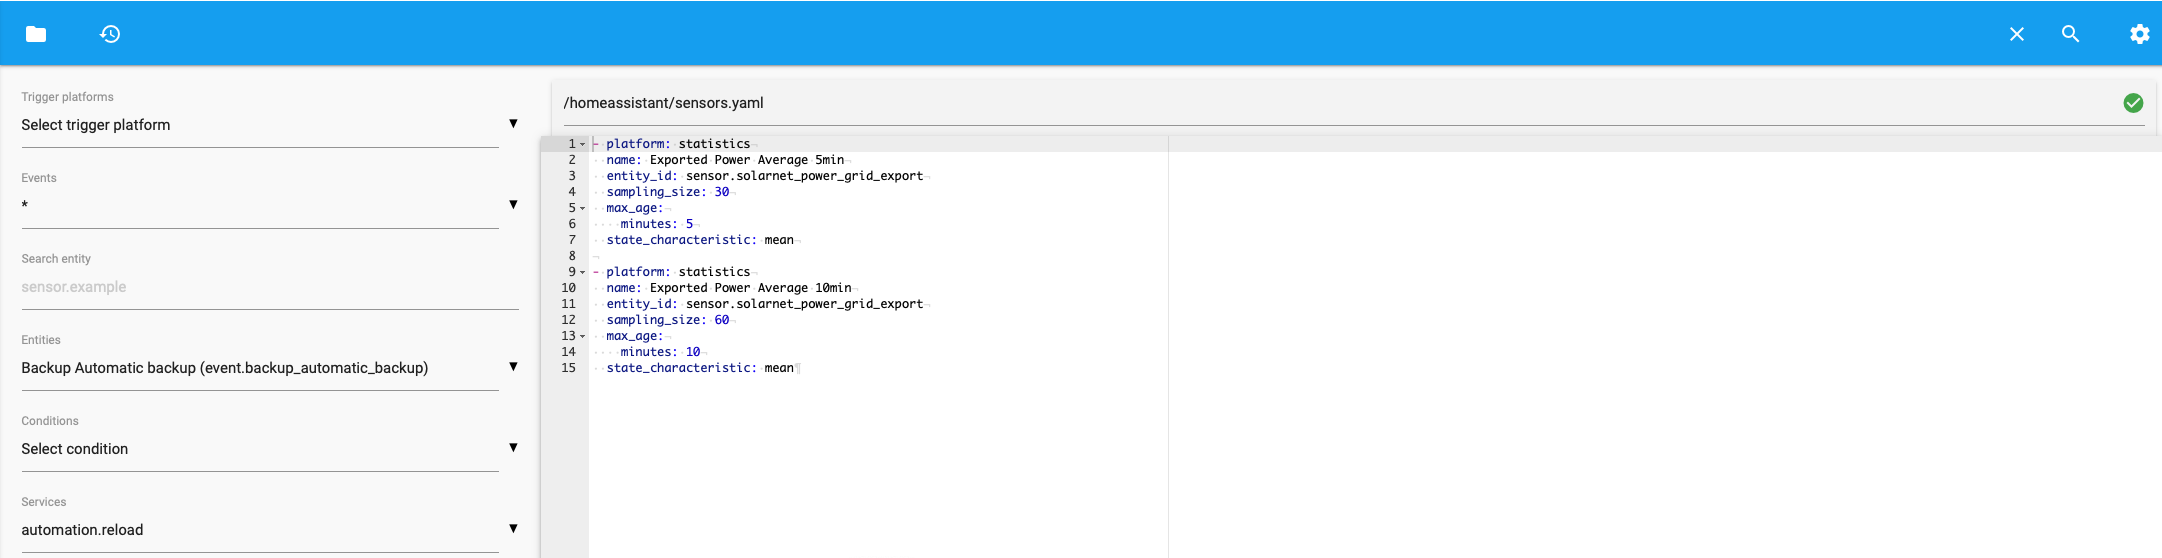
The simplest (more efficient) way is to define the yaml for the sensors in a file on the Home Assistant and include that reference in the configuration.yaml and reload the configuration (after validation).
- platform: statistics
  name: Exported Power Average 5min
  entity_id: sensor.solarnet_power_grid_export
  sampling_size: 30
  max_age:
    minutes: 5
  state_characteristic: mean

- platform: statistics
  name: Exported Power Average 10min
  entity_id: sensor.solarnet_power_grid_export
  sampling_size: 60
  max_age:
    minutes: 10
  state_characteristic: mean
You can play with more sampling_size, but these two worked ok for me. I decided to use in production the Average for 5 Minutes to be more reactive to the changes in the energy export production, but if you want a smoother behaviour you can go with the 10 minutes average (or higher).
For editing the files on the Home Assistant, it’s easy to install the File Editor extension and have that used for managing the content of the files on the device.
As soon as the sensors are defined, you can see them in the visual interface as well in Developer Tools – States:

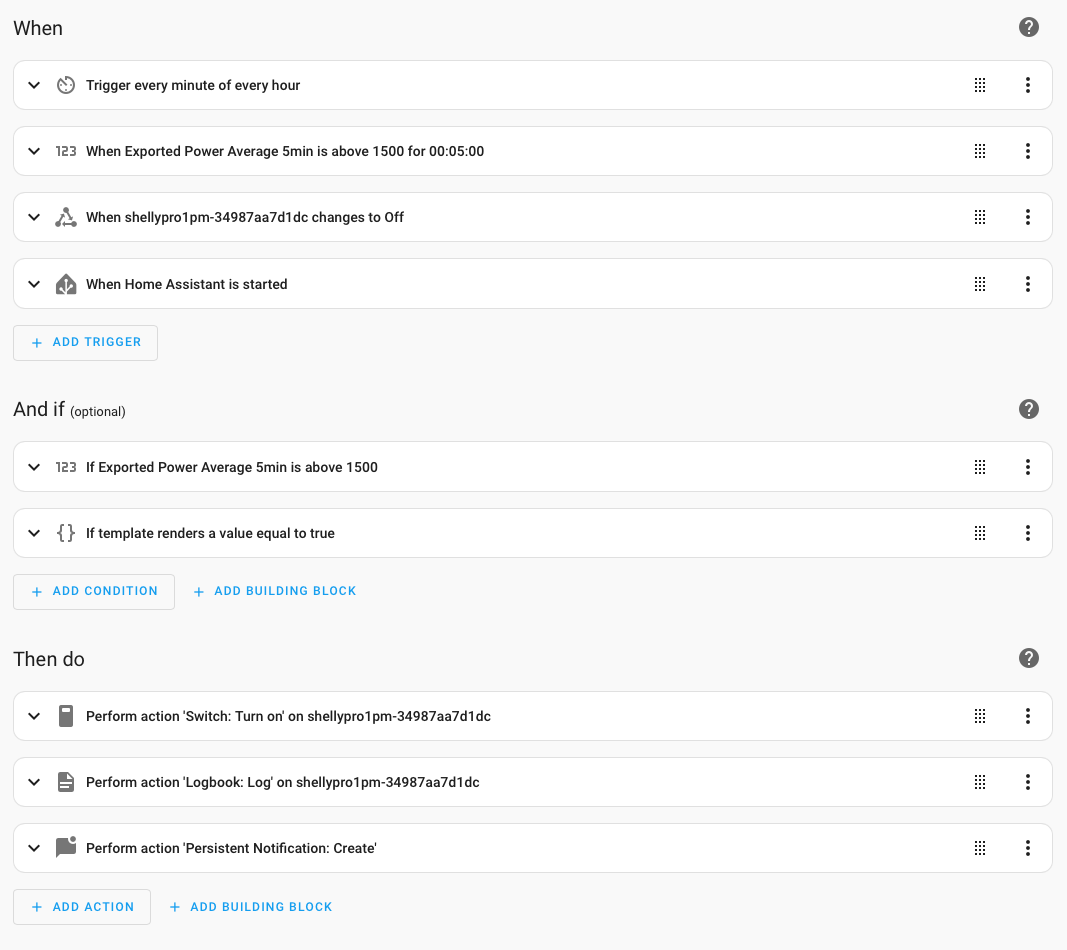
With those two sensors acting as variable for your automations, you can define the automations – when to turn ON and OFF the shelly switch. The automations can be added from Settings->Automations & Scenes->Create Automation and for easy control switch to YAML editor.
  alias: Start Boiler with Surplus Power (robust)
  triggers:
  - minutes: /1
    trigger: time_pattern
  - entity_id: sensor.exported_power_average_5min
    above: 1500
    for: 00:05:00
    trigger: numeric_state
  - entity_id: switch.shellypro1pm_34987aa7d1dc
    to: 'off'
    trigger: state
  - event: start
    trigger: homeassistant
  conditions:
  - condition: numeric_state
    entity_id: sensor.exported_power_average_5min
    above: 1500
  - condition: template
    value_template: "{{ states('switch.shellypro1pm_34987aa7d1dc') == 'off' and\n
      \  states('switch.shellypro1pm_34987aa7d1dc') not in ['unknown','unavailable']
      }}\n"
  actions:
  - target:
      entity_id: switch.shellypro1pm_34987aa7d1dc
    action: switch.turn_on
  - data:
      name: Boiler Automation
      message: Boiler turned ON due to 5min average export > 1500W
      entity_id: switch.shellypro1pm_34987aa7d1dc
    action: logbook.log
  - data:
      title: Boiler ON
      message: Surplus export average is above 1500W. Boiler started.
    action: persistent_notification.create
  mode: restart
You can also define the automation in the visual interface, but I consider the YAML version to be easier to manage.
For the OFF automation, the logic is similar structurally, with the main difference that even if the exported energy goes below 500W, you won’t turn off the shelly unless it was powered on for 30 minutes to avoid the self-close. That covers the scenario when you start the shelly when the export was 2100W for the last 5 minutes, the electric heater starts and consumes 2000W, then in less than 5 minutes you’d go below 500W and the shelly would go off, which may put a lot of pressure on the shelly and the electric heater.

When an action is executed, you can get a notification in the user interface – you can extend that to your phone as well (if you install the Home Assistant app) as long as you are connected with your mobile to the same network as the Home Assistant- otherwise you need to pay for the cloud services offered by the Nabu Casa which create more independence and allow all info/notifications to go through their cloud.

You’ll need to spend some time analysing the robustness of the automation, that it covers the corner scenarios and also adjust the thresholds (500 and 1500 are a decent guess now) and timing (5 minutes works of for now, could be extended for 10 minutes or more).
In the end, automation isn’t just about convenience or cost savings — it’s about understanding the systems that run our homes and finding ways to make them work better for us. This small project reminded me how much joy there is in learning by doing, especially when the outcomes are tangible, measurable, and a bit greener.

I’m looking forward to installing my energy storage battery, at that moment the automation will be re-architected to take into account the energy storage as well.
Until then, have fun, stay safe and learn every day!
Discover more from Liviu Nastasa
Subscribe to get the latest posts sent to your email.
